1. Cut the cartridge nozzle tip as shown in the figure, and set the adhesive in the sealant gun.

|
(1) |
10 mm (0.39 in) |
|
(2) |
8 mm (0.31 in) |
2. Prepare and clean the adhesion surfaces of the glass and body using the same procedures as for the windshield glass. 
3. Attach the fastener to the body.
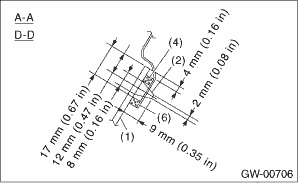
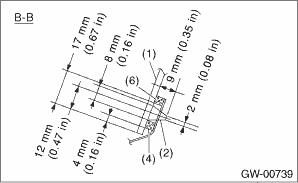
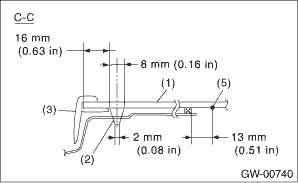
4. Attach the outer dam rubber at a position 4 (0.16 in) mm from the glass end.
5. On the front end, attach the inner periphery dam rubber at a position 13 mm (0.51 in) from the border of the glass ceramic gradation, and for other locations 17 mm (0.61 in) from the end of the glass.
6. Using the same procedures as for the windshield glass, apply primer to the glass and body.
7. Apply adhesive in the same procedure as for the windshield glass.

|
(1) |
Adhesive |
|
(2) |
Outer periphery dam rubber |
|
(3) |
Molding |
|
(4) |
Fastener |
|
(5) |
Locating pin |
|
(6) |
Inner periphery dam rubber |
|
A-A |
Upper end area |
|
B-B |
Lower end area |
|
C-C |
Front end area |
|
D-D |
Rear end area |
|
(1) |
Glass |
|
(2) |
Adhesive |
|
(3) |
Molding |
|
(4) |
Outer periphery dam rubber |
|
(5) |
Glass ceramic gradation border |
|
(6) |
Inner periphery dam rubber |
8. Insert the glass locating pins in the side panel holes, and push the area around the locating pins to affix the glass in place.
9. Push lightly on the area around the fastener and spacer to seal.
10. After completion of all work, allow the vehicle to stand for about 24 hours.
NOTE:
• When door is opened/closed after glass is bonded, always lower the door glass first, and then open/close it carefully.
• Move the vehicle slowly.
• For minimum drying time and vehicle standing time before driving after bonding, follow instructions or instruction manual from the adhesive manufacturer.
11. After curing of adhesive, pour the water on external surface of vehicle to check that there are no water leaks.
NOTE:
When a vehicle is returned to the user, tell him or her that the vehicle should not be subjected to heavy impact for at least three days.
12. Install the rear quarter trim.