1. Replace the rear differential side oil seal. 
NOTE:
After pulling out the drive shaft, be sure to replace with a new oil seal.
2. Insert the BJ or EBJ into the rear hub splines.
CAUTION:
• Be careful not to damage the magnetic encoder.
• Do not get closer the tool which charged magnetism to magnetic encoder.
|
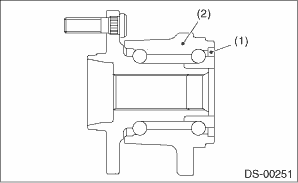
(1) |
Magnetic encoder |
|
(2) |
Rear hub unit bearing |
3. Draw the rear drive shaft into specified position.
CAUTION:
Do not hammer drive shaft when installing it.
4. Tighten the axle nut temporarily.
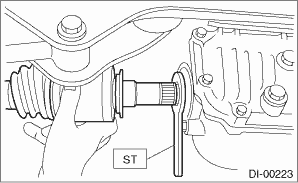
5. Using the ST, install the rear drive shaft to the rear differential.
| ST 28099PA090 | OIL SEAL PROTECTOR |
6. Attach the links to the rear housing and tighten them to the specified torque.
Tightening torque:
Stabilizer link
45 N·m (4.6 kgf-m, 33.2 ft-lb)
Shock absorber
120 N·m (12.2 kgf-m, 88.5 ft-lb)
Rear lateral link
120 N·m (12.2 kgf-m, 88.5 ft-lb)
Trailing link
90 N·m (9.2 kgf-m, 66.4 ft-lb)
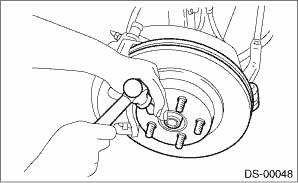
7. While pressing the brake pedal, tighten the new axle nuts to the specified torque.
Tightening torque:
190 N·m (19.4 kgf-m, 140.1 ft-lb)
CAUTION:
• Do not install wheel and let it touch the ground before tightening the axle nut. Failure to follow this rule may damage the axle bearing.
• Do not overtighten the nuts as this may damage the axle bearing.
8. Lock the axle nut securely.
9. Install the rear vehicle height sensor. (model with auto headlight beam leveler, left side only)
Tightening torque:
7.5 N·m (0.76 kgf-m, 5.5 ft-lb)
10. Fill the differential gear oil.
11. Install the rear wheels.
Tightening torque:
100 N·m (10.2 kgf-m, 73.8 ft-lb)
12. Connect the ground cable to battery.
13. Inspect the wheel alignment and adjust if necessary.
14. Perform reinitialization of the auto headlight beam leveler system. (model with auto headlight beam leveler)