1. Clean the crankshaft thread using compressed air.
2. Install the crank pulley.
3. Apply engine oil to the crank pulley bolt seat and thread.
4. Tighten the crank pulley bolts.
(1) Use the ST to lock the crank pulley, and temporarily tighten the crank pulley bolt.
| ST 499977400 | CRANK PULLEY WRENCH (AT MODEL) |
| ST 499977100 | CRANK PULLEY WRENCH (MT MODEL) |
Tightening torque:
47 N·m (4.8 kgf-m, 34.7 ft-lb)

(2) Draw reference lines (A) and (B) using a marker to set the socket to the crank pulley bolt as shown in the figure.
| ST 499977400 | CRANK PULLEY WRENCH (AT MODEL) |
| ST 499977100 | CRANK PULLEY WRENCH (MT MODEL) |
NOTE:
Set the socket onto the crank pulley bolt so that reference lines (A) and (B) is visible.
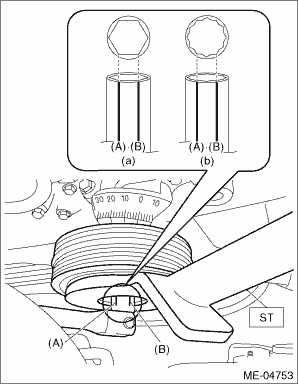
|
(a) |
When using 6-point socket |
|
(b) |
When using 12-point socket |
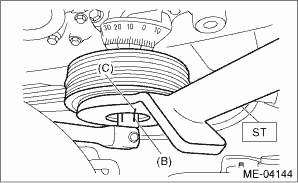
(3) Draw end line (C) on ST using a marker at the same position as reference line (B) was drawn on the socket in step (2).
| ST 499977400 | CRANK PULLEY WRENCH (AT MODEL) |
| ST 499977100 | CRANK PULLEY WRENCH (MT MODEL) |
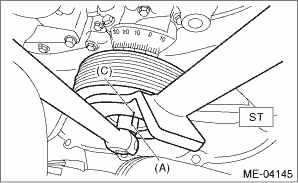
(4) Use the ST to lock the crank pulley, and tighten the crank pulley bolt to the angle where reference line (A) and end line (C) are aligned.
| ST 499977400 | CRANK PULLEY WRENCH (AT MODEL) |
| ST 499977100 | CRANK PULLEY WRENCH (MT MODEL) |
NOTE:
It should be approx. 60° when reference line (A) and end line (C) are aligned.
Tightening angle:
60°±5°
5. Install the V-belts. 
1. Clean the crankshaft thread using compressed air.
2. Install the crank pulley.
3. Apply engine oil to the crank pulley bolt seat and thread.
4. Tighten the crank pulley bolts.
(1) Remove the radiator main fan motor assembly and radiator sub motor assembly.
(2) Use the ST1 to lock the crank pulley, and temporarily tighten the crank pulley bolt.
| ST1 499977400 | CRANK PULLEY WRENCH (AT MODEL) |
| ST1 499977100 | CRANK PULLEY WRENCH (MT MODEL) |
Tightening torque:
47 N·m (4.8 kgf-m, 34.7 ft-lb)
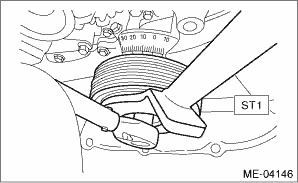
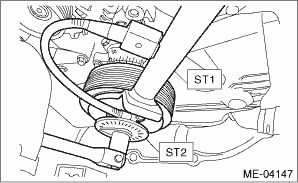
(3) Set the ST2, use the ST1 to lock the crank pulley, and tighten the crank pulley bolt to the specified angle.
| ST1 499977400 | CRANK PULLEY WRENCH (AT MODEL) |
| ST1 499977100 | CRANK PULLEY WRENCH (MT MODEL) |
| ST2 18854AA000 | ANGLE GAUGE |
NOTE:
Attach the magnet used for securing the ST2 (ANGLE GAUGE) to ST1.
Tightening angle:
60°±5°
(4) Install the radiator main fan motor assembly and radiator sub motor assembly.
5. Install the V-belts.