NOTE:
• Perform the work with the engine installed to body when replacing a single part. Refer to “Valve Clearance” for preparation. 
• When performing the work with the engine installed to body, the following parts must also be removed/installed.
- Center exhaust pipe
- Turbocharger
- Joint pipe
- Front exhaust pipe
1. Remove the V-belts.
2. Remove the intake manifold.
3. Remove the crank pulley.
4. Remove the timing belt cover.
5. Remove the timing belt.
6. Remove the cam sprocket.
7. Remove the bolt which installs the A/C compressor bracket on cylinder head.
8. Remove the secondary air combination valve.
9. Remove the oil pipe.
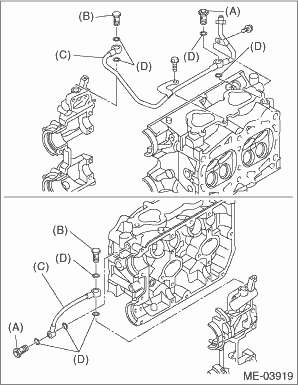
|
(A) |
Union screw with filter (with protrusion) |
|
(B) |
Union screw without filter (without protrusion) |
|
(C) |
Oil pipe |
|
(D) |
Gasket |
10. Remove the camshaft.
11. Remove the oil level gauge guide. (LH side only)
12. Remove the cylinder head bolts in alphabetical order shown in the figure.
NOTE:
Leave the bolts (A) and (D) engaged by three or four threads to prevent the cylinder head from falling.
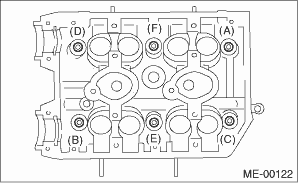
13. While tapping the cylinder head with a plastic hammer, separate it from cylinder block. Remove the bolts (A) and (D) to remove cylinder head.
14. Remove the cylinder head gasket.
CAUTION:
Be careful not to scratch the mating surface of cylinder head and cylinder block.
15. Similarly, remove the right side cylinder head.