1. Disconnect the ground cable from the battery.
2. Shift the select lever or gear shift lever to neutral.
3. Release the parking brake.
4. Loosen the wheel nuts on both sides.
5. Jack up the vehicle and support it with rigid racks.
6. Remove the wheels.
7. Remove the rear exhaust pipe and muffler.
Non-turbo model
 and
and
Turbo model
8. Remove the DOJ of rear drive shaft from rear differential.
(1) Remove the ABS wheel speed sensor cable clamp and the parking brake cable clamp from bracket.
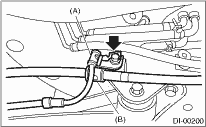
|
(A) |
ABS wheel speed sensor cable clamp |
|
(B) |
Parking brake cable clamp |
(2) Remove the ABS wheel speed sensor cable clamp from the trailing link.
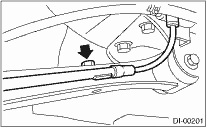
(3) Remove the ABS wheel speed sensor cable clamp and the parking brake cable guide from the trailing link.
|
(A) |
Parking brake cable guide |
|
(B) |
ABS wheel speed sensor cable clamp |
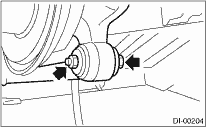
(4) Remove the rear stabilizer link.
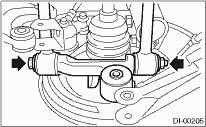
(5) Remove the bolts which secure the trailing link to the housing.
(6) Remove the bolts which secure the front and rear lateral links to the rear housing.
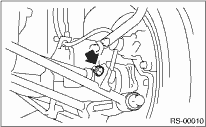
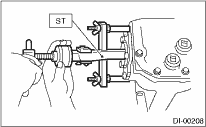
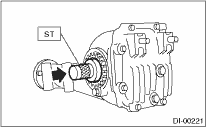
(7) Remove the DOJ from the rear differential by using ST.
NOTE:
When removing the DOJ from the rear differential, fit the ST to the bolts (A) as shown in figure so as not to damage the side bearing retainer.
| ST 28099PA100 | DRIVE SHAFT REMOVER |
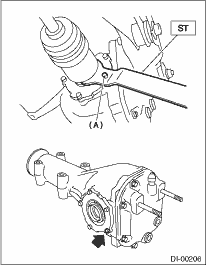
|
(A) |
Bolt |
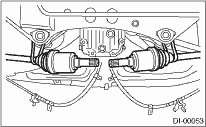
9. Suspend the rear drive shaft to the rear crossmember using wire.
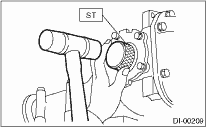
10. Remove the oil seal using ST.
| ST 398527700 | PULLER ASSY |
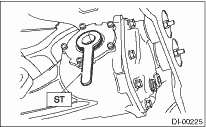
11. Install a new side oil seal using the ST.
NOTE:
Apply chassis grease to the oil seal lips.
| ST 398437700 | DRIFT |
12. Insert the DOJ into rear differential.
(1) Attach the ST to rear differential.
| ST 28099PA090 | SIDE OIL SEAL PROTECTOR |
(2) Install the spline shaft until the spline portion is inside the side oil seal using ST.
| ST 28099PA090 | SIDE OIL SEAL PROTECTOR |
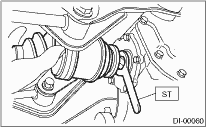
(3) Remove the ST.
| ST 28099PA090 | SIDE OIL SEAL PROTECTOR |
13. Hereafter, reassemble in the reverse order of disassembly.
1. Disconnect the ground cable from the battery.
2. Shift the select lever or gear shift lever to neutral.
3. Release the parking brake.
4. Loosen the wheel nuts on both sides.
5. Jack up the vehicle and support it with rigid racks.
6. Remove the wheels.
7. Remove the rear exhaust pipe and muffler.
Non-turbo model
8. Remove the DOJ of rear drive shaft from rear differential.
(1) Remove the ABS wheel speed sensor cable clamp and the parking brake cable clamp from bracket.
|
(A) |
ABS wheel speed sensor cable clamp |
|
(B) |
Parking brake cable clamp |
(2) Remove the ABS wheel speed sensor cable clamp from the trailing link.
(3) Remove the ABS wheel speed sensor cable clamp and the parking brake cable guide from the trailing link.
|
(A) |
Parking brake cable guide |
|
(B) |
ABS wheel speed sensor cable clamp |
(4) Remove the rear stabilizer link.
(5) Remove the bolts which secure the trailing link to the housing.
(6) Remove the bolts which secure the front and rear lateral links to the rear housing.
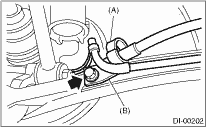
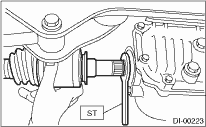
(7) Remove the DOJ from the rear differential by using a tire lever.
NOTE:
• When removing the DOJ from the rear differential, fit the tire lever to the bolts as shown in the figure so as not to damage the axle shaft holder.
• The side spline shaft snap ring is removed together with the shaft.

|
(A) |
Tire lever |
|
(B) |
Side holder |
9. Suspend the rear drive shaft to the rear crossmember using wire.
10. Remove the oil seal using a screwdriver.

|
(A) |
Side oil seal |
|
(B) |
Screwdriver |
11. Install a new side oil seal using the ST.
NOTE:
Apply grease to the oil seal lips.
| ST 498447100 | OIL SEAL INSTALLER |
12. Insert the DOJ into rear differential.
NOTE:
Before inserting, replace the snap ring on the end of spline shaft with a new part.
(1) Attach the ST to rear differential.
| ST 28099PA090 | SIDE OIL SEAL PROTECTOR |

(2) Install the spline shaft until the spline portion is inside the side oil seal.
(3) Remove the ST.
| ST 28099PA090 | SIDE OIL SEAL PROTECTOR |
(4) Push the rear housing to insert the DOJ into rear differential.
NOTE:
Make sure that the oil seal lip does not bend toward inside.
13. Hereafter, reassemble in the reverse order of disassembly.