1.CHECK RESISTANCE OF SOLENOID VALVE.
1) Turn the ignition switch to OFF.
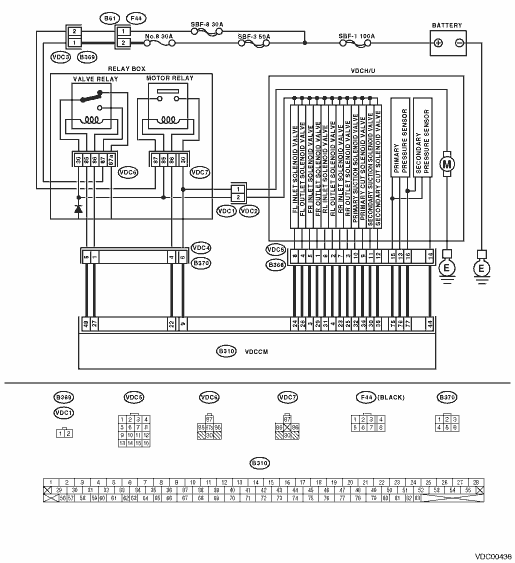
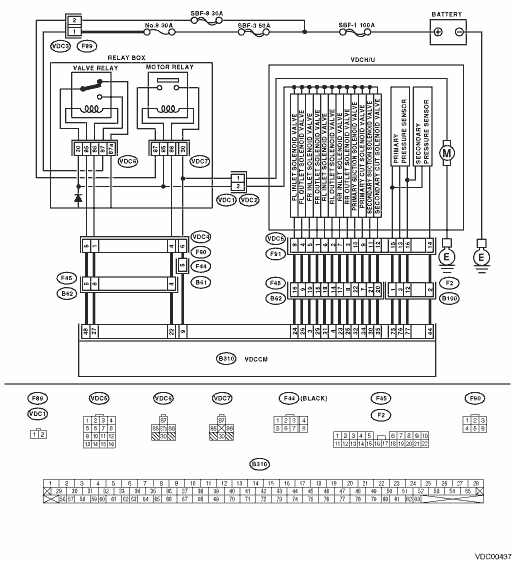
2) Disconnect the two connectors (VDC1, F91) from VDCH/U.
3) Measure the resistance between VDCH/U connector terminals.
Connector & terminal
DTC 31
(VDC5) No. 5 — (VDC2) No. 2:
DTC 33
(VDC5) No. 8 — (VDC2) No. 2:
DTC 35
(VDC5) No. 7 — (VDC2) No. 2:
DTC 37
(VDC5) No. 6 — (VDC2) No. 2:
DTC 61
(VDC5) No. 9 — (VDC2) No. 2:
DTC 62
(VDC5) No. 12 — (VDC2) No. 2:
|
Is the resistance between 8.04 — 9.04 Ω?
|
|
Replace the VDCH/U. 
|
2.CHECK SOLENOID VALVE GROUND SHORT.
Measure the resistance between VDCH/U connector and chassis ground.
Connector & terminal
DTC 31
(VDC5) No. 5 — Chassis ground:
DTC 33
(VDC5) No. 8 — Chassis ground:
DTC 35
(VDC5) No. 7 — Chassis ground:
DTC 37
(VDC5) No. 6 — Chassis ground:
DTC 61
(VDC5) No. 9 — Chassis ground:
DTC 62
(VDC5) No. 12 — Chassis ground:
|
Is the resistance 1 MΩ or more?
|
|
Replace the VDCH/U.
|
3.CHECK SOLENOID VALVE BATTERY SHORT.
1) Disconnect the connector from VDCCM.
2) Measure the voltage between VDCH/U connector and chassis ground.
Connector & terminal
DTC 31
(VDC5) No. 5 (+) — Chassis ground (−):
DTC 33
(VDC5) No. 8 (+) — Chassis ground (−):
DTC 35
(VDC5) No. 7 (+) — Chassis ground (−):
DTC 37
(VDC5) No. 6 (+) — Chassis ground (−):
DTC 61
(VDC5) No. 9 (+) — Chassis ground (−):
DTC 62
(VDC5) No. 12 (+) — Chassis ground (−):
|
Is the voltage less than 1 V?
|
|
Replace the VDCH/U.
|
4.CHECK SOLENOID VALVE BATTERY SHORT.
1) Turn the ignition switch to ON.
2) Measure the voltage between VDCH/U connector and chassis ground.
Connector & terminal
DTC 31
(VDC5) No. 5 (+) — Chassis ground (−):
DTC 33
(VDC5) No. 8 (+) — Chassis ground (−):
DTC 35
(VDC5) No. 7 (+) — Chassis ground (−):
DTC 37
(VDC5) No. 6 (+) — Chassis ground (−):
DTC 61
(VDC5) No. 9 (+) — Chassis ground (−):
DTC 62
(VDC5) No. 12 (+) — Chassis ground (−):
|
Is the voltage less than 1 V?
|
|
Replace the VDCH/U.
|
5.CHECK BATTERY SHORT OF HARNESS.
1) Turn the ignition switch to OFF.
2) Measure the voltage between VDCCM connector and chassis ground.
Connector & terminal
DTC 31
(B310) No. 3 (+) — Chassis ground (−):
DTC 33
(B310) No. 24 (+) — Chassis ground (−):
DTC 35
(B310) No. 23 (+) — Chassis ground (−):
DTC 37
(B310) No. 31 (+) — Chassis ground (−):
DTC 61
(B310) No. 34 (+) — Chassis ground (−):
DTC 62
(B310) No. 35 (+) — Chassis ground (−):
|
Is the voltage less than 1 V?
|
|
Repair the harness between VDCCM and VDCH/U.
|
6.CHECK BATTERY SHORT OF HARNESS.
1) Turn the ignition switch to ON.
2) Measure the voltage between VDCCM connector and chassis ground.
Connector & terminal
DTC 31
(B310) No. 3 (+) — Chassis ground (−):
DTC 33
(B310) No. 24 (+) — Chassis ground (−):
DTC 35
(B310) No. 23 (+) — Chassis ground (−):
DTC 37
(B310) No. 31 (+) — Chassis ground (−):
DTC 61
(B310) No. 34 (+) — Chassis ground (−):
DTC 62
(B310) No. 35 (+) — Chassis ground (−):
|
Is the voltage less than 1 V?
|
|
Repair the harness between VDCCM and VDCH/U.
|
7.CHECK GROUND SHORT CIRCUIT OF HARNESS.
1) Turn the ignition switch to OFF.
2) Measure the resistance between VDCCM connector and chassis ground.
Connector & terminal
DTC 31
(B310) No. 3 — Chassis ground:
DTC 33
(B310) No. 24 — Chassis ground:
DTC 35
(B310) No. 23 — Chassis ground:
DTC 37
(B310) No. 31 — Chassis ground:
DTC 61
(B310) No. 34 — Chassis ground:
DTC 62
(B310) No. 35 — Chassis ground:
|
Is the resistance 1 MΩ or more?
|
|
Repair the harness between VDCCM and VDCH/U.
|
8.CHECK HARNESS CONNECTOR BETWEEN VDCCM AND VDCH/U.
1) Connect the connectors (B368) (LHD model) and (F91) (RHD model) to VDCH/U.
2) Measure the resistance between the VDCCM connector and VDCH/U connector.
Connector & terminal
DTC 31
(B310) No. 3 — (VDC2) No. 2:
DTC 33
(B310) No. 24 — (VDC2) No. 2:
DTC 35
(B310) No. 23 — (VDC2) No. 2:
DTC 37
(B310) No. 31 — (VDC2) No. 2:
DTC 61
(B310) No. 34 — (VDC2) No. 2:
DTC 62
(B310) No. 35 — (VDC2) No. 2:
|
Is the resistance between 7 — 10 Ω?
|
|
Repair the connector between VDCCM and VDCH/U.
|
9.CHECK POOR CONTACT OF CONNECTOR.
|
Is there poor contact in connector between the VDCCM and VDCH/U?
|
|
|
10.CHECK THE VDCCM.
1) Connect all connectors.
3) Perform the Inspection Mode.
|
Is the same DTC displayed again?
|
Repair the VDCCM.
|
|
11.CHECK ANY OTHER DTC ON DISPLAY.
|
Are other DTCs displayed?
|
Go to the diagnosis corresponding to the DTC.
|
Temporary poor contact occurs.
|